The fairy wand can also be made as an accessory to any dress-up or Halloween costume. You can change the ornament on the end to any shape you want. I went with a classic star shape, but you could also make it a heart, or even make it a wizards wand for a boy by changing the colors to black and dark blue, and the shape on the end a diamond.
Supplies needed to make the Fairy Wand:
* wooden dowel
* hot glue gun
* colored felt
* ribbon
* beads(optional)
Start by cutting a couple of lengths of ribbon to attach to the end of the wand. I cut mine about 15 inches each, in two different colored ribbons. Use a hot glue gun to attach these to the end of the wooden dowel. I folded the pieces of ribbon in half, then added a small strip of hot glue, and pressed the ribbon down onto the dowel.
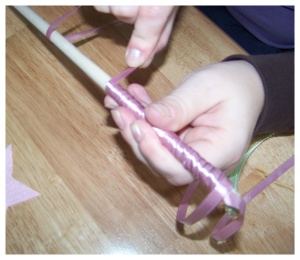
Next you will add the ribbon to cover the entire dowel. You will have to work fast to do this, and work in small sections at a time as the glue tends to dry very fast.
First add a small strip of glue to the base of the dowel on the end that you already glued your ribbon streamers. Leaving about 10" slack at the bottom, start winding the ribbon up the shaft of the dowel. Stop winding when you have covered the glue strip. Add another glue strip and continue winding the ribbon. Repeat this over and over until the entire wooden dowel is covered neatly with ribbon. Trim the ribbon off of the top of the dowel and secure in place with a dollop of glue. Using the 10" of remaining ribbon at the bottom of the dowel, tie a knot around the very end of the fairy wand and secure in place with a small dollop of glue. Make sure and place the glue under the ribbon and keep it hidden. You can trim the end of the ribbon to match the rest of the ribbon streamers at the end of the wand.
Now to add the cloth accents to the top of the fairy wand. I used a star shape to make my wand. I downloaded a great star shape pattern from Familyfun.com. Print the pattern and cut out the shapes. Use the pattern to pin down onto some colored felt to cut out the pieces used to make the top of the fairy wand. Cut out two of the largest star shapes for the base. You can cut out the smaller stars from different colored felt to create pretty decorative accents on the wand.
Once you have cut two of the largest star shapes, place them both together and hand sew them together with matching thread. You will want to sew the stars together only about 3/4's of the way shut to leave an opening for stuffing.
Apply a strip of hot glue to the end of the dowel which you will attach the star to. Hold the sewn star shape open and press the dowel down against the felt so the glue will hold it in place. Now stuff the star shape full with polyester or cotton filling. A great idea is to also fill the inside of the star with some small bells, or rattle, along with the filling. Hand stitch the star shut.
The last step is to decorate the outside of the star. Of course you can stop here and it will still be a fun and cute dress up toy, but I like to get creative and decorative with my baby toys.
I started by sewing on the smaller star shapes to create decorative accents. I went one step further and even added some pretty beads to outline the colored felt stars.
Books in PDF format to read:
Stephen William Hawking - Space And Time WarpsBasil Crouch - Fairy Gold
Labels: spiritual worlds travels equinox gospel according free rune courses regum ritual ceremony life roman paganism sense understanding comes constructing witch


